Magento V1 Performance Improvements
Welcome back!, this is our third part of Magento Performance Improvements, and we will make a general and quick review of the advanced tasks that we can make into our Magento when our store has lot traffic or when all of the other tweaks are not enough, or you simply want to make your store shine.
If you no have visited our other two posts, we recommend checkout them to be sure and know if you made all the recommended steps to boost the speed for your store.
In case that you already tried everything to speed up your store and need or want more performance, you can try making the following tweaks and tips. We remember that these tips can be applied on any website, and depending on the technologies used and specifications of each environment.
Advanced Tasks
MySQL Configurations
One of the most important enhancements you can make to your Magento installation is to properly configure your MySQL database server.
A proper MySQL configuration requires a low-level understanding of your underlying hardware and, primarily, the memory (RAM) available.
There is one specific MySQL configuration parameter above all others that will produce significant performance improvements and takes very little understanding to implement.
The single most effective configuration item for enhancing the performance of Magento is MySQL’s cache queries configuration parameters.
As we reviewed into the other posts of improvements, we know that Magento Commerce has a complex but very effectively database, and as such, requires a great deal of database access and read operations. However, Magento also makes many identical queries each time a page is viewed with relatively little changes in these queries over time.
Each time a Magento page is loaded, a series of database queries are made and the database server must go to work.
Each query is first parsed and the execution of the query is initiated. Then the data must be retrieved from the disk or storage media, sorted and manipulated, and then ultimately returned to the client. This results in performance slowdowns because of, among other things, slower disk access.
MySQL offers a built-in configuration parameter known as query_cache_size. This configuration directive tells the MySQL server to store the result of the query in memory—much faster than accessing from disk.
The actual size of this cache and number of query result sets cached is dependent on the amount of memory available to your MySQL database server.
IMPORTANT: Extremely large query cache sizes should not be used. The larger the query cache size, the greater the impact of the data validation MySQL performs on the cache when a table has changed, and the resulting set of data in the cache is no longer valid. The bottom line is not to use a query cache size larger than what you need.
How To Check If Query Caching Is Enabled
mysql> SHOW VARIABLES LIKE 'have_query_cache';
+------------------+----------+
| Variable_name    | Value    |
+------------------+----------+
| have_query_cache | YES      |
+------------------+----------+
If you are using a standard MySQL binary this value is always YES, even if query caching is disabled so it’s not a time for great joy, yet. To verify that query cache is actually operational, you can issue the following command to the MySQL server:
mysql> SHOW VARIABLES LIKE 'query_cache_size';
+------------------+----------+
| Variable_name    | Value    |
+------------------+----------+
| query_cache_size | 67108864 |
+------------------+----------+
1 row in set (0.00 sec)
This shows that we have 64 MB available to our query cache size, a very respectable amount of memory. The following demonstrates a server that has MySQL query cache disabled by setting the value to zero:
mysql> SHOW VARIABLES LIKE 'query_cache_size';
+------------------+----------+
| Variable_name    | Value    |
+------------------+----------+
| query_cache_size | 0        |
+------------------+----------+
1 row in set (0.00 sec)
If you have root access, making a change to this value is trivial. Simply add the following line to your my.conf file in the [mysqld] section and restart your MySQL server:
query_cache_size=32MQuery caching is an extremely effective and simple method that can use to improve your Magento performance in minutes. Query caching offers several other configuration parameters that should also be carefully considered when configuring your MySQL server, here an example of further configs that you can try.
innodb_thread_concurrency = 2 * [numberofCPUs] + 2
innodb_flush_log_at_trx_commit = 2
thread_concurrency = [number of CPUs] * 3
thread_cache_size = 32
table_cache = 1024
query_cache_size = 64M
query_cache_limit = 2M
join_buffer_size = 8M
tmp_table_size = 256M
key_buffer = 32M
innodb_autoextend_increment=512
max_allowed_packet = 16M
max_heap_table_size = 256M
read_buffer_size = 2M
read_rnd_buffer_size = 16M
bulk_insert_buffer_size = 64M
myisam_sort_buffer_size = 128M
myisam_max_sort_file_size = 10G
myisam_max_extra_sort_file_size = 10G
myisam_repair_threads = 1
MySQLTuner
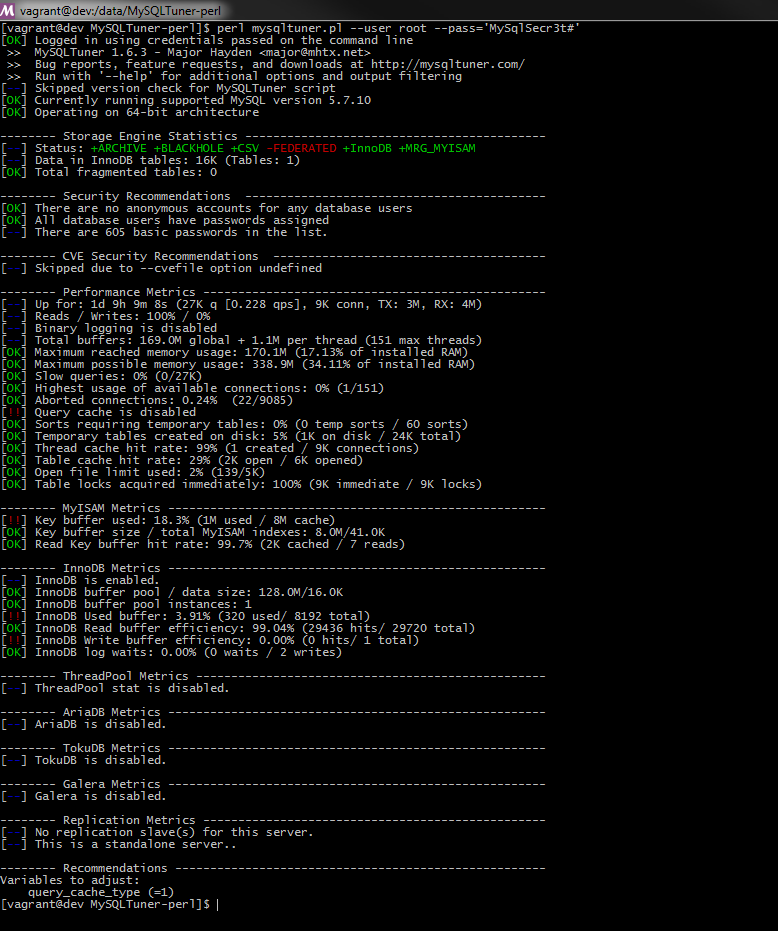
MySQLTuner is a Perl script that allows you to review a MySQL installation quickly and make adjustments to increase performance and stability. The current configuration variables and status data are retrieved and presented in a brief format along with some basic performance suggestions.
As we can see, this script can help us into many points to tweak our MySQL Configurations, you can check how is the process and what exactly this scripts check this page MySQLTuner Internals
Download/Installation and simple usage
You can download the entire repository by using ‘git clone’ followed by the cloning URL above. The simplest and shortest method is:
wget http://mysqltuner.pl/ -O mysqltuner.pl
wget https://raw.githubusercontent.com/major/MySQLTuner-perl/master/basic_passwords.txt -O basic_passwords.txt
wget https://raw.githubusercontent.com/major/MySQLTuner-perl/master/vulnerabilities.csv -O vulnerabilities.csv
perl mysqltuner.pl
Simple and minimal usage locally
perl mysqltuner.pl PHP Accelerators
As we mention in our previous post of Magento Improvements Part 1, we have the default Cache system which works very well, but always we can improve the performance using a PHP accelerator.
A PHP extension basically works by caching the compiled opcode/bytecode of PHP representation of PHP files to avoid the overhead of parsing and compiling source code on each request (some or even most of which may never be executed).
To further improve performance, the cached code is stored in shared memory and directly executed from there, minimizing the amount of slow disk reads and memory copying at runtime.
We can find several PHP Accelerators:
But we will review Zend OpCache, which currently is maintained and has support to PHP 7, you can make a quick review in Github, let’s get started to install it for PHP 5.4.
Install with Pecl
$ sudo pecl install zendopcache-7.0.4
Find where opcache.so is located
:~$ sudo find / -name 'opcache.so'
Add the extension to php.ini
zend_extension=/usr/local/etc/php/opcache.so
Test your new config
:~$ php -v
Zend Engine v2.5.0, Copyright (c) 1998-2014 Zend Technologies
with Zend OPcache v7.0.4, Copyright (c) 1999-2014, by Zend Technologies
Tweak the opcache.ini
zend_extension=opcache.so

; Determines if Zend OPCache is enabled
opcache.enable=1

; Determines if Zend OPCache is enabled for the CLI version of PHP
;opcache.enable_cli=0

; The OPcache shared memory storage size.
opcache.memory_consumption=256

; The amount of memory for interned strings in Mbytes.
opcache.interned_strings_buffer=12

; The maximum number of keys (scripts) in the OPcache hash table.
; Only numbers between 200 and 100000 are allowed.
opcache.max_accelerated_files=16000

; The maximum percentage of "wasted" memory until a restart is scheduled.
;opcache.max_wasted_percentage=5

; When this directive is enabled, the OPcache appends the current working
; directory to the script key, thus eliminating possible collisions between
; files with the same name (basename). Disabling the directive improves
; performance, but may break existing applications.
;opcache.use_cwd=1

; When disabled, you must reset the OPcache manually or restart the
; webserver for changes to the filesystem to take effect.
opcache.validate_timestamps=0

; How often (in seconds) to check file timestamps for changes to the shared
; memory storage allocation. ("1" means validate once per second, but only
; once per request. "0" means always validate)
;opcache.revalidate_freq=2

; Enables or disables file search in include_path optimization
;opcache.revalidate_path=0

; If disabled, all PHPDoc comments are dropped from the code to reduce the
 ;size of the optimized code.
opcache.save_comments=0

; If disabled, PHPDoc comments are not loaded from SHM, so "Doc Comments"
; may be always stored (save_comments=1), but not loaded by applications
; that don't need them anyway.
opcache.load_comments=0

; If enabled, a fast shutdown sequence is used for the accelerated code
opcache.fast_shutdown=1

; Allow file existence override (file_exists, etc.) performance feature.
opcache.enable_file_override=1

; A bitmask, where each bit enables or disables the appropriate OPcache
; passes
;opcache.optimization_level=0xffffffff

;opcache.inherited_hack=1
;opcache.dups_fix=0

; The location of the OPcache blacklist file (wildcards allowed).
; Each OPcache blacklist file is a text file that holds the names of files
; that should not be accelerated.
opcache.blacklist_filename=/etc/php.d/opcache*.blacklist

; Allows exclusion of large files from being cached. By default all files
; are cached.
;opcache.max_file_size=0

; Check the cache checksum each N requests.
; The default value of "0" means that the checks are disabled.
;opcache.consistency_checks=0

; How long to wait (in seconds) for a scheduled restart to begin if the cache
; is not being accessed.
;opcache.force_restart_timeout=180

; OPcache error_log file name. Empty string assumes "stderr".
opcache.error_log=/var/log/php5/php5-opcache.error.log

; All OPcache errors go to the Web server log.
; By default, only fatal errors (level 0) or errors (level 1) are logged.
; You can also enable warnings (level 2), info messages (level 3) or
; debug messages (level 4).
opcache.log_verbosity_level=3

; Preferred Shared Memory back-end. Leave empty and let the system decide.
;opcache.preferred_memory_model=

; Protect the shared memory from unexpected writing during script execution.
; Useful for internal debugging only.
;opcache.protect_memory=0
OPcache Control Panel in Magento Admin
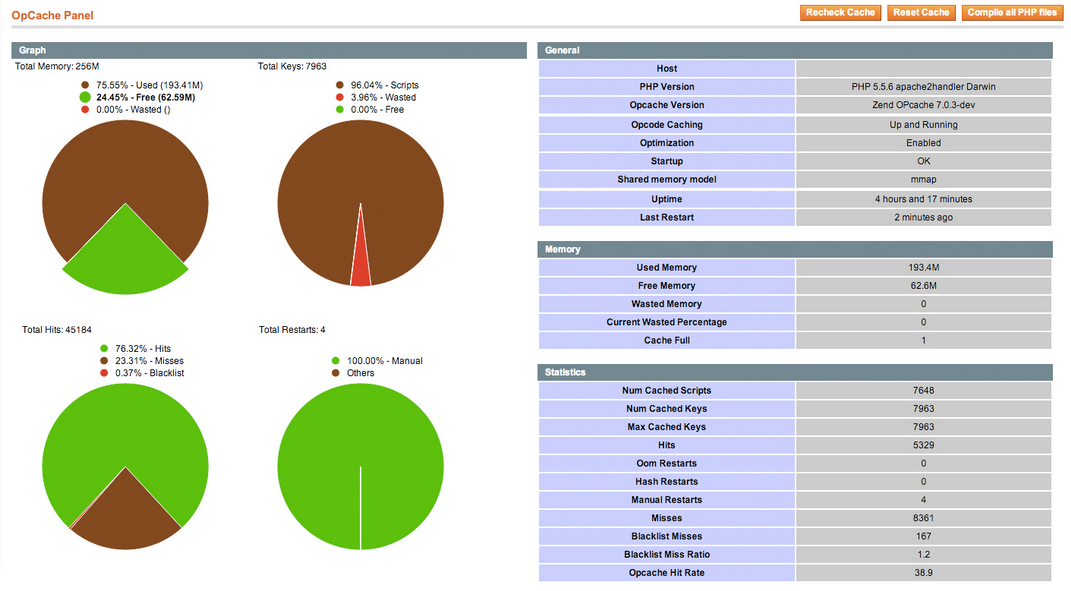
You can always make your life easier with the correct software. Since OPcache is a complex module, it can make a lot of headaches. In order to save your life from unnecessary troubles, you can rely on OPcache control panel for the backend of your Magento store.
With OPcache Control Panel for the Backend, you will be able to recheck and reset cache in an easy manner. It also provides the ability to compile all PHP files in app and lib directories without any troubles. In addition, you will get SVG pie charts with live reload within every 5 seconds.
Installation
This extension can be installed using modman or into the traditional way, you can choose the option that you feel most comfortable, we prefer the traditional way, download the source code and copy the files into Magento folder.
Download the GitHub Source Code extract the file and copy into Magento
$ wget https://github.com/SchumacherFM/Magento-OpCache/archive/master.zip && unzip master.zip
$ cp Magento-OpCache-master/* Your_Magento_Path/
Don’t forget Clean Cache after install and re-login to the admin panel. System -> Cache Management -> Flush Cache Storage
You will can find the control panel of this extension in System -> Configuration -> System -> OpCachePanel Settings.
Also is possible clean cache through code using the following:
<?php Mage::getModel('opcache/cache')->reset(); ?>Important: This can’t be used on command line but you can do it with cURL using this command:
curl --data "keyName=keyValue" http://magento-store.tld/opcachepanel
CONCLUDING THOUGHTS
I hope that you found helpful these posts about how to reduce your page load time. If you have followed this guide and the other posts, and put the steps into practice and measure your store’s page load time before and after the optimisation, you should see a clear improvement. And please feel free to leave feedback in the comments section below – any further guidance would be greatly appreciated.


