The DOM is what most people are talking about when they are talking about a web page’s elements rendered in your browser. The DOM, or the Document Object Model, is the API that allows a web browser to interact with and render the HTML, CSS and Javascript to create a webpage.
When you think about creating a web page, we typically think about the HTML elements we structure and style and interactive with using CSS and JS. For the sake of simplicity, we will call the elements you see rendered as the Light DOM.
The Shadow DOM by contrast is a way to create elements that are not affected by the same attributes and properties as those in the Light DOM. The Shadow DOM provides true scope encapsulation; your element’s CSS and JS are scoped to it alone! Think of the Shadow DOM as a lightweight version of an iframe.
To render elements created via the Shadow DOM, you must ‘inject’ them into the Light DOM. We’ll cover some examples of this later in the post.
You have already seen the Shadow DOM
You might not even be aware, but you have already seen the Shadow DOM in action already. A lot of complex input elements rendered in the browser are actually created via the Shadow DOM due to the encapsulated styling and javascript scope.
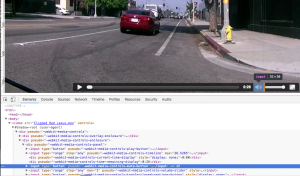
The most common example is the Video Tag. Take this simple example tag:
<video src="Clipped_Red_Lexus.mov" controls></video>
This simple tag results in the following rendered HTML in your browser:

Notice how much “extra” HTML is rendered under the “#shadow-root”. This code is generated by your browser automatically to give you these complex UI elements like the Play Button and the Volume Slider.
These elements have their own styling and event listeners that are not affected by the host DOM.
Why should we care about the Shadow DOM?
Using the Shadow DOM you can create truly re-usable pieces of code you know will act reliably no matter where you place them. Create one widget, and use it in any of your code, and stop worry about CSS and JS collisions!
Also, most importantly, the Shadow DOM is the base from which the modern web is being built upon.
When we talk about web components, we are talking about the implementation of the Shadow DOM. When you see those fancy ‘live’ updating forms in Angular2, again, Shadow DOM.
Clearly, understanding this is quite important to understanding these new web frameworks.
Example 1: Inserting Elements into a Host Root
Here is a very basic example illustrating using the Shadow DOM to inject elements into a host root.
Example 2: Isolated styles in a Shadow DOM Element
Here is a very basic example showing the isolated CSS styling when using the Shadow DOM.
Please note the injected element’s CSS does not affect the CSS in the host element. Only the injected elements are red.
Example 3: Insertion Points with “content” tags
Here is an example showing insertion points and querying using the content tag. (Please note, that in Shadow DOM v1, the content tag will be replaced by the slot selector, read more about this below in “Whats Next”)
This simple example shows how one can select some content from the host element, inject it into the Shadow DOM template, which in turn get injected into the host DOM.
Whats next?
We reviewed some concepts about the Shadow DOM laid out in what is commonly referred to as “Shadow DOM v0”. This is to say we are working with the very first iteration of the implementation.
The new spec for v1 has, for the most part, been agreed upon and the major browser publishers are working on implementing the new features.
Hayato Ito at Google has a great list explaining some of the changes we can expect along with simple examples showing these new features.
Conclusion
While I provided only simple examples of the Shadow DOM, I hope this inspires you to explore more yourself. Thanks for reading!
